This page will show the steps to digitize the video
- Left click the DISKUS mouse (pointer which shows up on the SONY monitor).
A vertical menu should appear (MAIN MENU).
Main Menu
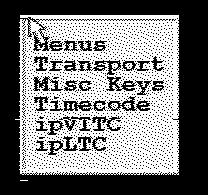
- Choose Menus if you want to alter the configuration.
Menus Menu
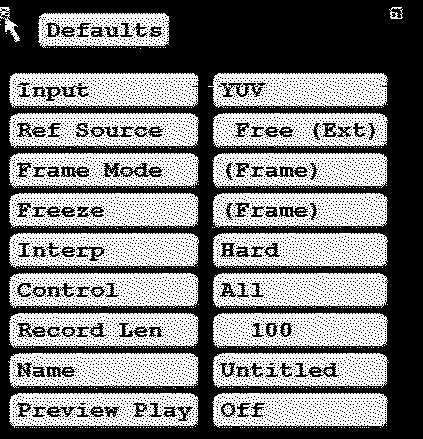
The only item of interest is the Record Len field. This sets the maximum number
of frames that will be saved onto DISKUS. The number of frames can range from 0
(which defaults to maximum) to 1843.
- On the Main Menu choose Transport if you are ready to digitize the video.
Transport Menu
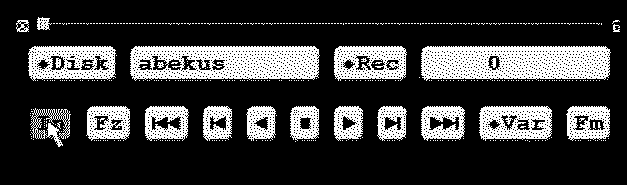
- The In button toggles the monitor input from DISKUS to the VCR.
Start the VCR and if you do not see the video being played on the SONY
monitor, toggle the In button.
- When you see a part of the video that you want to record, click on the
record button and then the > button. The frame counter will start increasing
as frames are being recorded onto DISKUS.
- Recording will continue for as long as the configured duration or until
1843 frames have been recorded (total).
- The video clip is now stored on DISKUS. You should process this video
since DISKUS records over the same 1843 frames. (any further work will
overwrite what is stored on DISKUS).
- NOTE: you can use the >> button or << button to advance through
the 1843 frames on DISKUS. If you have not recorded anything, frames from a
previous recording session are shown. Also, the slide bar will allow you to
quickly move through the frames to the desired position.
- NOTE: For recording a specific number of frames you can click on the
diamond button beside "REC". This will bring up a keypad where you can enter
the number of frames to record. Click "OK" to accept the number entered. Start
video on SVHS and click "REC" and "PLAY" with the mouse to record the number
of frames.
See the manual for more detailed descriptions.
Back