| |
GeoDesign
Tutorial 2 - Advanced Query & Theme Modification
Tutorials 2-4 are in a three-part sequence. In these three tutorials you will use queries, theme modification, overlay functions and some raster analysis to select a site for a new fire station. In this tutorial 2, you will begin the process by performing some some queries and theme modification to assist you in visually identifying suitable sites. The criteria for a suitable site (for now) is based on
the following five criteria:
- What parcels are currently vacant?
- What parcels are in areas zoned for commercial use?
- What parcels are not covered by water?
- What parcels are not occupied by parks?
- What parcels are greater than or equal to 10000 sqft in area size?
A. SETTING UP YOUR PROJECT
- Before you add data in, you have one thing to do: to tell ArcMap
to record only "relative path" to all the data sources
(as opposed to absolute path). Using relative paths allows you
to transfer your map between different computers without trouble,
especially when you plan to store your maps in a jump flash drive.
Different computer may designate a different drive locator (E:
or F: or G: and so on) to the jump drive. Now go to File > Map Document Properties and check Store relative pathnames to data sources. Click OK.

- Download the following six datasets by clicking HERE and put them into your working directory on the desktop, you may name it ex2 (remember
to unzip and extract them using Windows Explorer):
- Fire Districts
- Shoreline (polygon)
- Parcel Boundaries
- Parklands and Green Space
- Zoning
- Municipal Boundaries
- Then Open ArcMap, Once ArcMap has opened, add all six of your data
layers into ArcMap.
- Look at the zoning codes in the attribute table of the Zoning layer
by right clicking on the name of the zoning layer,
then choosing Open Attribute Table. Compare the zoning
codes there to those listed in the City of Seattle's Munipal
Code by clicking
here.
Which zoning codes represent commercial uses? (tip: any zoning code
comes with the word "commercial", e.g. Industrial Commercial.)
B. SELECTING VACANT PARCELS
Your unit of analysis is a parcel. By this, I mean that ultimately the
Real Estate Division of the Seattle Fire Department is looking for a parcel
or a set of adjacent parcels to purchase and develop into a fire station.
So in our first step, we will find the vacant parcels.
- First, right-click on the Parcel layer's name and
choose Open Attribute Table to view what attributes
might help us find the vacant parcels. Which attributes look like they would be most appropriate? What values of those attributes would indicate a vacant parcel? Write these down for your write-up. When you're done, close the attribute table.
- In the Selection menu, select Select By Attributes....
- In the query window, select the parcel layer and
choose to create a new selection.
- Next, you will be querying for parcels whose PRES_USE_D contains
the string "Vacant". To do this, you'll need
to select the operator Like, and you'll need to use
a wildcard character in the last box. The wildcard character % represents a string of any length, so searching for the string %Vacant% will search for any string that has the word "Vacant"
somewhere within it. You also need to use a pair of single quote marks ' to contain the string %Vacant%.
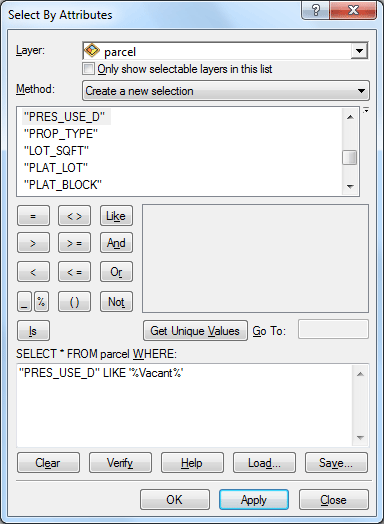
- in the Select By Attributes box, set a new query
statement as the one shown above.
To execute the query, click Apply. When the query is
done, click OK.
- Now, right-click on the Parcel layer's name and choose Data > Export Data.... You should see the dialog box
shown below:
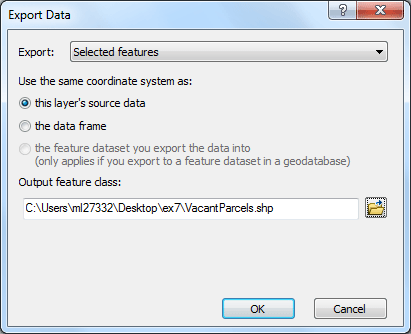
Set Export to Selected features and
export them to a new dataset in your own directory named something like
"VacantParcels.shp", then click OK.
This will create a new shapefile that contains only the parcels that
you selected in the query.
- When you are asked whether to add the new layer to your project, click Yes.
- Then clear selected features by going to Select menu
> Clear Selected Features
- To see only the vacant parcels, turn off the layer of parcel by unchecking its box in the Table of Contents.
- Adjust the symbology for Vacant Parcels as you see fit.
C. SELECTING COMMERCIAL ZONES
Next you will select commercially-zoned areas and dissolve them to make them easier to use in visually identifying suitable locations.
- Use the same process as above to select Zoning areas from zoning layer that have a ZONELUT that contains the letter "C" (capital letter C) This will select
all areas that have either a commercial zoning or a mixed residential/commercial
zoning.
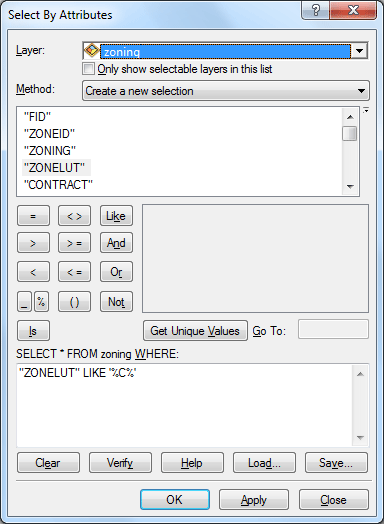
- After you have selected the commercial areas, export them to a new
dataset in your own directory named something like "CommercialZones.shp".
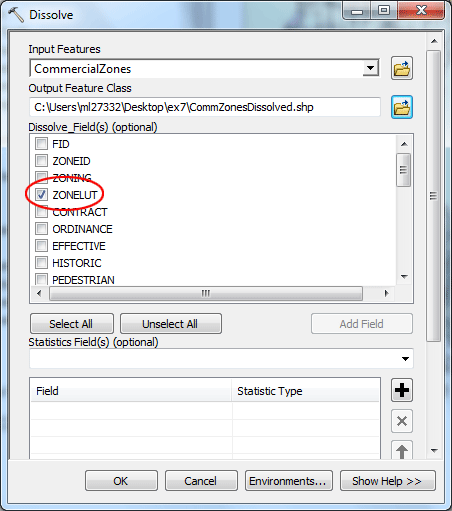
- Next you will dissolve the commercial zones to a single multi-part
shape for each specific zoning code. click ArcTools icon
 . .
- Select Dissolve under Data Management Tools > Generalization
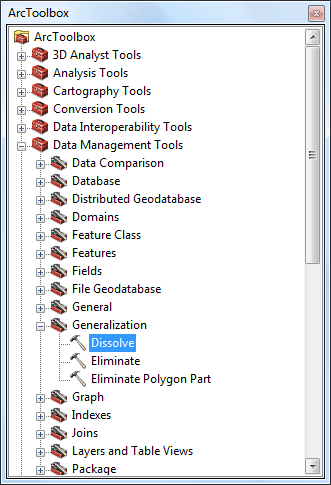
- Set the drop-down box in Input Features to CommercialZones,
check ZONELUT as Dissolve_Field, and give your output
shapefile a name such as "CommZonesDissolved.shp". Click OK.
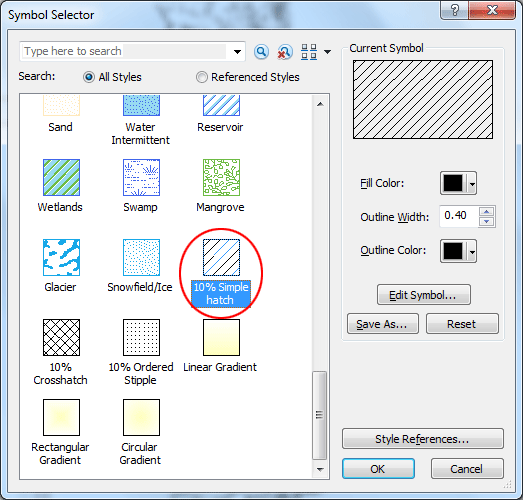
- Click on the symbol for your CommZonesDissolved.shp layer to modify it.
Change it to one of the pre-set patterns that has "hatching",
or diagonal lines, on it, such as "10% Simple Hatch".
- Now that you have a dissolved layer of commercial zones, you don't
need to see the other zoning layers. In the Table of Contents, uncheck
the boxes next to both Zoning and CommercialZones,
but leave checkbox checked next to CommZonesDissolved.
D. ADJUSTING YOUR VIEW
In the last step, adjust the order of your layers so that you can see
all of the relevant information.
- You may notice that there are some vacant parcels that are located
off some of the shorelines, especially around Discovery Park to the northwest corner of the city, the point
located near the west end of the Ship Canal. To hide these, move both
your Commercial Zones Dissolved and your Vacant
Parcels layers below your SHORELIN layer.
- Also note that some of the commercial zones are actually parks, such
as along the Burke-Gilman bicycle trail to the northeast of the University
of Washington campus. But for our purposes, parks are not suitable locations
for a new fire station. To hide these areas, move the Parks layer above both the Commercial Zones Dissolved and the Vacant Parcels layers.
- Even though parks are off-limits, we might still be interested in
what zoning and vacant lots are within them. To see them at the same
time, we can make the Parks layer semi-transparent.
To do this, go into the Customize menu and select Toolbars > Effects.
You'll see a new toolbar that looks like this:

In this toolbar, set the Layer to parks,
then click on the Adjust Transparency button. You should now see a slider control that looks
like this:
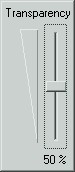
Using your mouse, drag the slider until the gauge says "50%",
then let go of the mouse button. The parks layer should
now be half transparent to the layers underneath it. You may want to
also change the Transparency for Parcel layer.
- Your last task is to cruise around the map using your navigation tools
to search for areas of the city that seem (by visual observation only)
to be the most underserved in terms of fire station proximity. For these
areas, are there vacant lots that are commercially-zoned and are not
within parks, where we might want to place a fire station?
Save your project file in your project directory.
In next tutorial you will continue this process by overlaying these various
layers to methodically find suitable locations.
The Next Step:
Save your project file in your project directory.
In next tutorial, you will continue this process by overlaying these various layers to methodically find suitable locations.
prepared by Ming-Chun Lee, 09/17/2014
|