HomeExercises |
 |
ARCH4050 / ARCH6050 / MUDD6050 Tutorial 10 - Proximity Objectives:
Background:In this tutorial, you will learn how to use various GIS techniques to measure proximity from a community center to its surrounding area. SetupCreate a new directory on your desktop, name it lab10. Click here to download a zip file, which contains a dataset for this tutorial. Save this in your lab10 directory, then when the download is complete, extract the file there; you will now have a set of shapefiles and two Excel files in that directory. Open ArcMap. Click File > Add Data, select all four shapefiles, and add them to the Table of Contents in your ArcMap file.
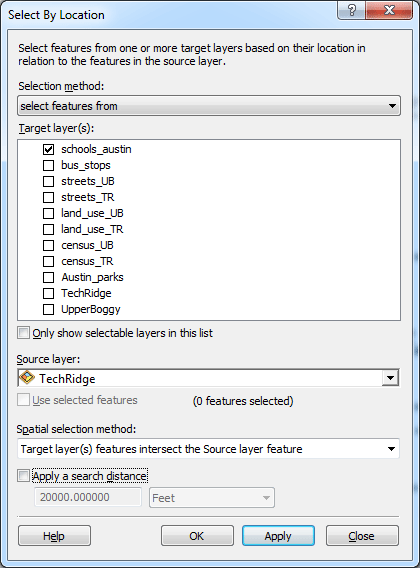
Turn off all the layers except leaving the layers schools_austin and TechRidge on. We are going to select the only school that is located in the Tech Ridge neighborhood. To begin selecting features by location, you click the Selection menu and click the Select by Location option. In the Select by Location dialog box, set all the options to be read like the following: I want to select features from the following layers schools_austin that intersect the features in this layer TechRidge. Click OK.
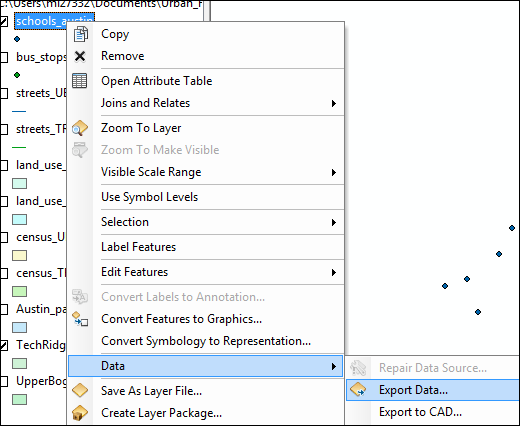
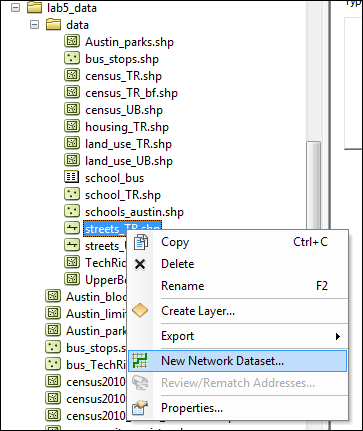
Now you should see the school that is located in the Tech Ridge neighborhood has been highlighted. Now, right-click on the schools_austin layer's name in the table of content and choose Data > Export Data....
You should see the dialog box shown below:
Set Export to Selected features and export them to a new dataset in your own directory name the new dataset school_TR, then click OK. This will create a new shapefile that contains only the school that you selected in the query When you are asked whether to add the new layer to your project, click Yes Then clear selected features by going to Select menu > Clear Selected Features turn off the layer schools_austin by unchecking its box in the Table of Contents Zoom to layer TechRidge (right-click and then select Zoom to Layer) Now we can use this school as the center of the neighborhood and examine the proximity of this center to some of the surrounding physical features in the neighborhood area, such as housing units and bus stops, we can also take a look at population that reside within a walking distance from the school. Turn on land_use_TR layer, which contains all the parcels within the one-mile buffer from the boundary of the Tech Ridge neighborhood. View the new layer and its attribute table to verify that everything came out OK. You want to make sure that theattribute table contains the LAND_USE_2 field and that all parcels display on the map. The LAND_USE_2 field specifies the uses of the parceled land in year 2006. Some of the values that are for residential uses are listed below:
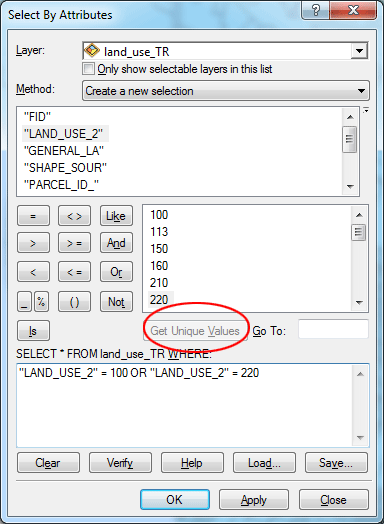
For the tutorial, we are going to only look for single family and apartment units. In the Selection menu, select Select By Attributes.... In the query window, select the land_use_TR layer and choose to create a new selection, in the Select By Attributes box, set a new query statement as the one shown below. To execute the query, click Apply. When the query is done, click OK.
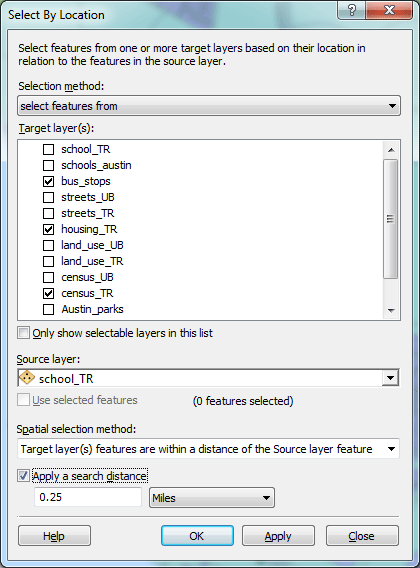
Then right-click on the land_use_TR layer's name and choose Data > Export Data to create a housing_TR layer that only has all the Single Family and Apartment units. Then clear selected features by going to Select menu > Clear Selected Features. Now turn off the land_use_TR layer You can now select only those parcels that are within a walking distance (0.25 mile) from the school. There are a few different ways you can do this. You can create a quarter-mile buffer around the school point, then use this buffer to intersect the parcels. Or you can use select by location to select only those parcels that are with a quarter-mile distance from the school, then export the selected features again from the parcels layer. Let’s use the second method. In fact, you can select from multiple layers based on a selection query at the same time, Turn on both bus_stops and census_TR layer. The bus_stops layer has all the bus stops within the city limit. The census_TR layer has all the census blocks within the one-mile buffer from the boundary of the Tech Ridge neighborhood. This census_TR layer comes with some basic census data, such as population counts. click the Selection menu and click the Select by Location option. In the Select by Location dialog box, set all the options to be read like the following:
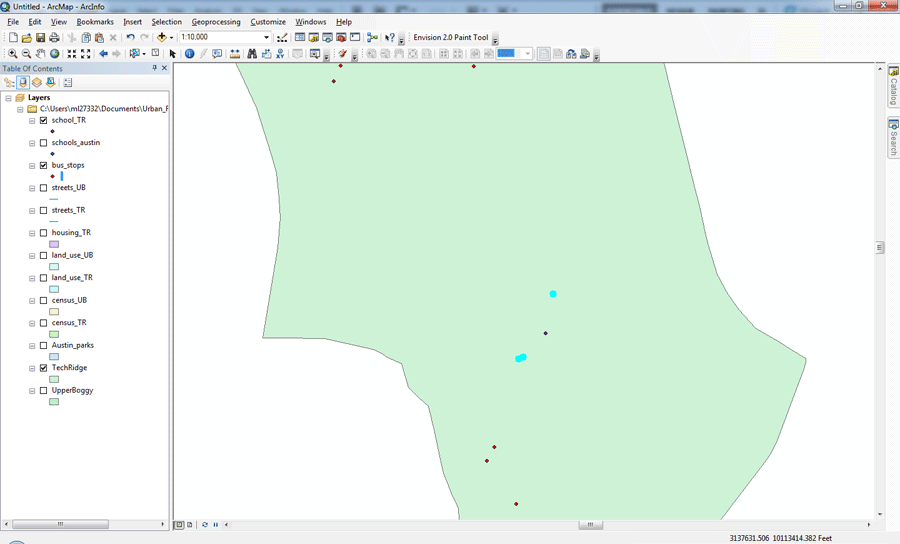
Be sure to use “within a distance of the Source layer feature” as the method. Examine each of the three layers to see what features have been selected. For example, turn on only bus_stops layer and you can see that not many stops are within a walking distance from the school. Turn on only housing_TR layer and you can see that still a lot of housing units are outside a walking distance from the school in Tech Ridge neighborhood.
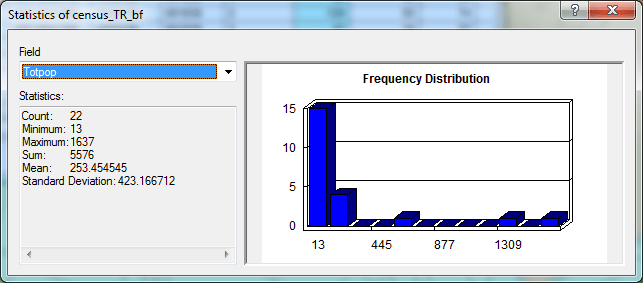
You can further export the selected features from each of the three layers. Let’s do it for the census_TR layer first you can later do it for the other two layers. Then right-click the census_TR layer's name and choose Data > Export Data to create a census_TR_bf layer that only has all the census blocks that are within a quarter-mile distance from the school. Then clear selected features by going to Select menu > Clear Selected Features. View the new layer and open its attribute table to verify that everything came out OK. You want to make sure that the attribute table contains the Totpop field and that all blocks display on the map. This field contains total numbers of population for each of the census blocks.
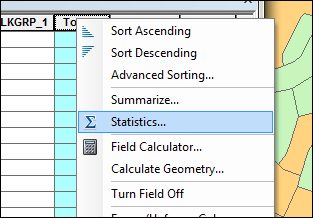
Do a quick summary statistics, right-click the field header, select Statistics,
You should see a small dialog window shows some basic statistics, such as sum: 5576. That is the total number of population within a quarter-mile from the school.
In addition to the buffer method, we can also calculate the distance between the center and any given feature in order to examine the concept of proximity. The tool we can use is either Near or Generate Near Table
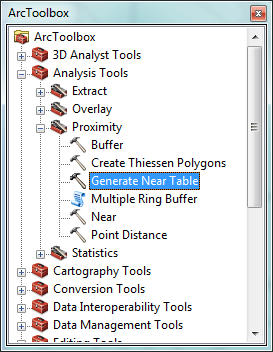
We will use the second tool to create a distance table that measures the distances between the school and the surrounding bus stops within one-mile search radius. In the ArcToolbox, click Generate Near Table
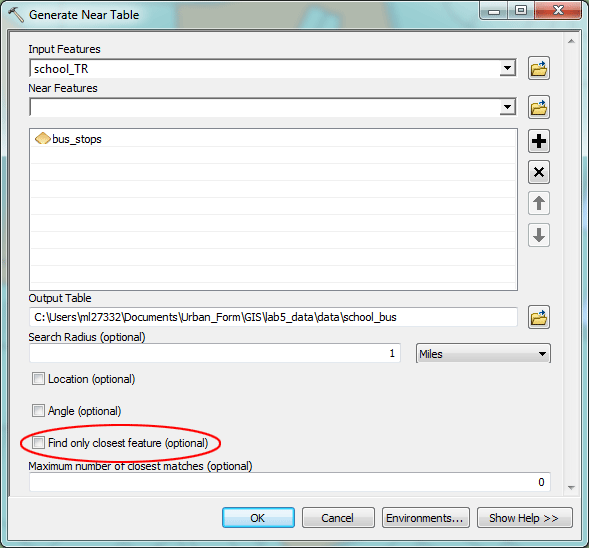
The input features should be School_TR layer, the near features should be bus_stops layers. Save the output table in your directory and name it school_bus, set the search radius to 1 mile, uncheck the box Find only closest feature. You want to search for all the near features and calculate distances between them and the school.
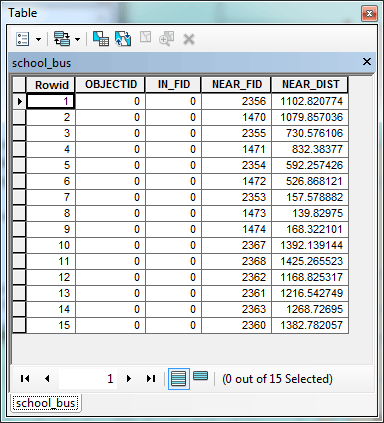
The resultant output table will be added in the table of contents. Open it. The field NEAR_DIST contains the distances between the school and the bus stops that are within one-mile range.
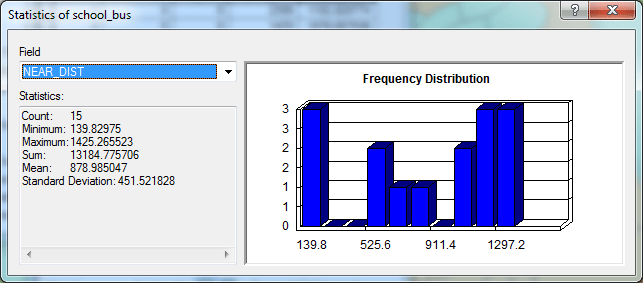
You can again do a quick summary statistics, right-click the field header, select Statistics,
The sum 13184.78 is the total distances from the school to the surrounding bus stops within the one-mile search radius. Generate Near Table only calculates straight-line distances between features. However, in reality, people travel between different places via a street network. ArcGIS Network Analyst allows us to calculate distances between origins and destinations based on a true street network. It also allows us to create network-based buffers to study service capacity or proximity among various features. We are going to create a network based on a street layer streets_TR. Please refer back to the Tutorial 9 and follow the instructions to create a very simple basic network using ArcCatalog. Open ArcCatalog, make a connection to your directory, find streets_TR layer, right-click it, then choose New Network Dataset…
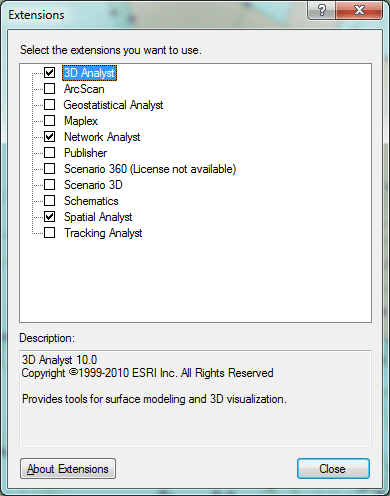
Please then follow the instructions in the tutorial 3 to build the network for Network Analyst, When you are finished, close ArcCatalog and go back to ArcMap. Add the new network streets_TR_ND to the map. Click Yes and add the other feature classes when prompted. ArcGIS Network Analyst extension allows you to build a network dataset and perform analyses on a network dataset. Enable the Network Analyst extension. Click Customize > Extensions. The Extensions dialog box opens. Check Network Analyst. Click Close.
If the Network Analyst toolbar is not displayed, you need to add it. Click Customize > Toolbars > Network Analyst. The Network Analyst toolbar is added to ArcMap.
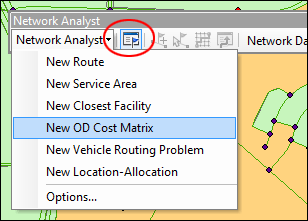
On the Network Analyst toolbar, click the Show/Hide Network Analyst Window button . The dockable Network Analyst window opens, next to the table of contents Creating an OD cost matrix analysis layer You can create an origin–destination cost matrix to find the total distance from each origin to its destination. Click Network Analyst on the Network Analyst toolbar and click New OD Cost Matrix
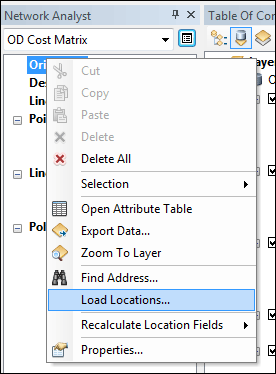
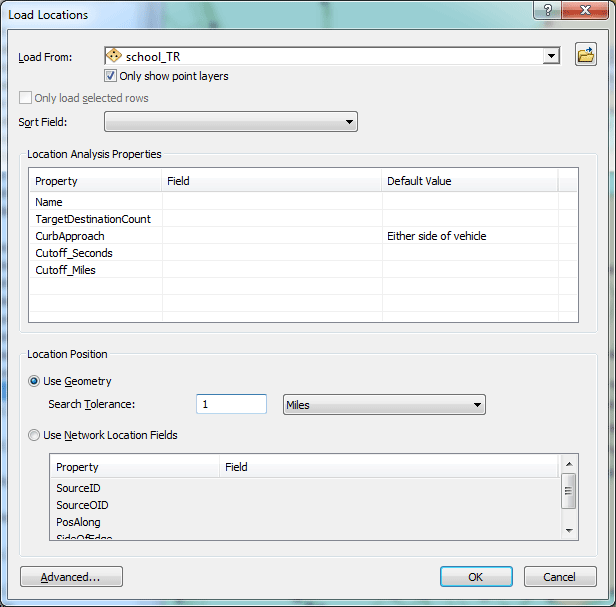
The OD cost matrix analysis layer is added to the Network Analyst window. The network analysis classes (Origins, Destinations, Lines, Point Barriers, Line Barriers, and Polygon Barriers) are empty. Adding origins In the Network Analyst window, right-click Origins (0) and choose Load Locations. The Load Locations dialog box opens.
Click school_TR in the Load From drop-down list. Under Location Position, click Use Geometry. Set the Search Tolerance to 1 mile.
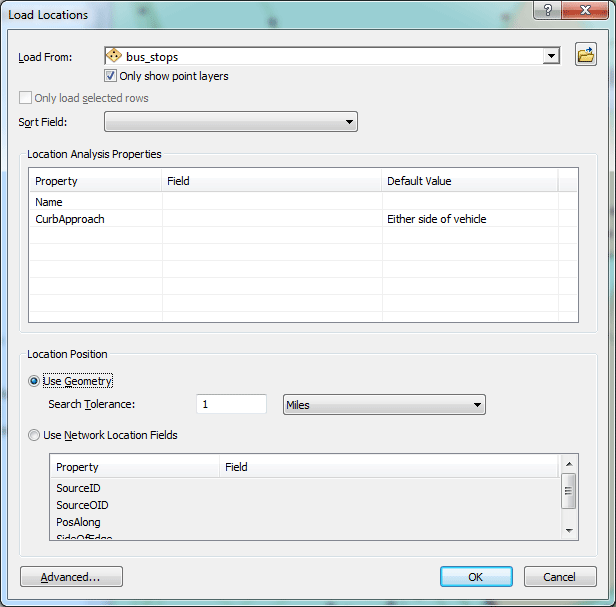
Click OK. Adding destinations In the Network Analyst window, right-click Destinations (0) and choose Load Locations Choose bus_stops in the Load From drop-down list Under Location Position, click Use Geometry. Set the Search Tolerance to 1 mile.
Click OK.
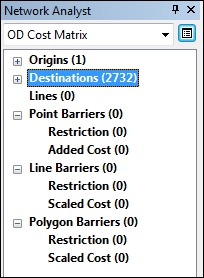
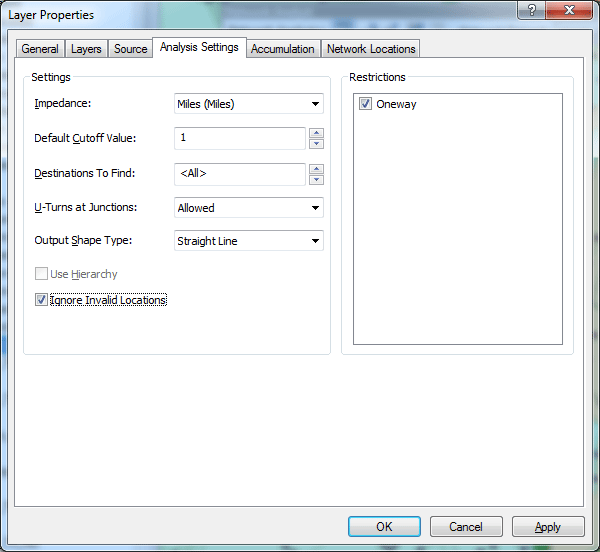
These destinations are also displayed on the map Setting up the parameters for the analysis Next, you will specify that your OD cost matrix will be calculated based on distance. You will set a default cutoff value of 1 mile and ensure that all destinations are found within the specified cutoff. Click the Analysis Layer Properties button on the Network Analyst window
Click the Analysis Settings tab Make sure that the Impedance drop-down list is set to Miles (Miles). Type 1 in the Default Cutoff Value text box Make sure that Destinations To Find is set to <All>. Make sure that Ignore Invalid Locations is checked
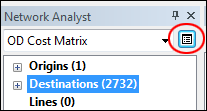
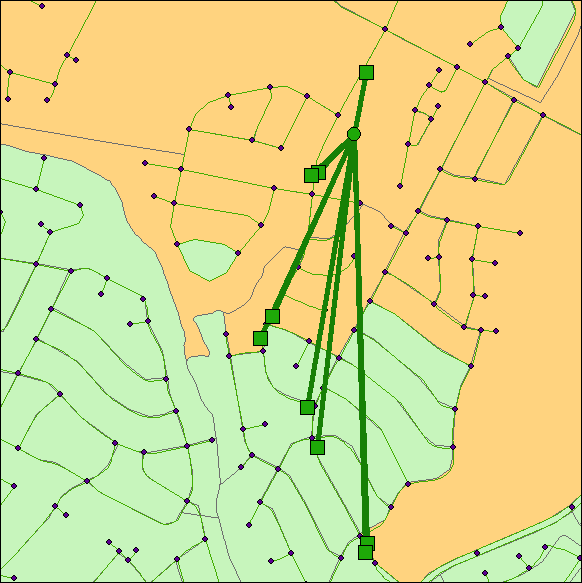
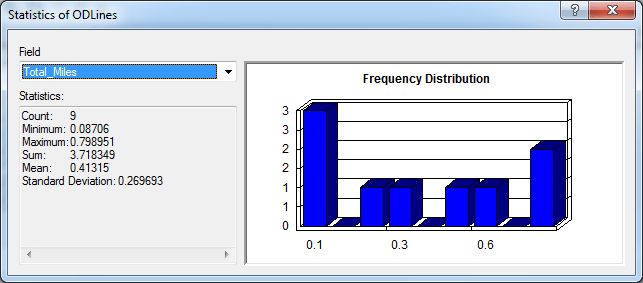
Click OK. Click the Solve button on the Network Analyst toolbar. Ignore the warning message you may receive about unaccounted bus stops. The OD lines appear on the map. There are 9 lines in this example.
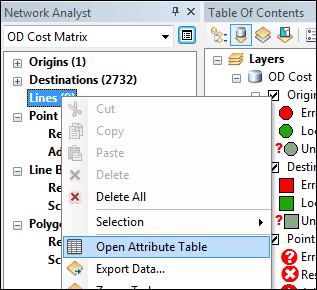
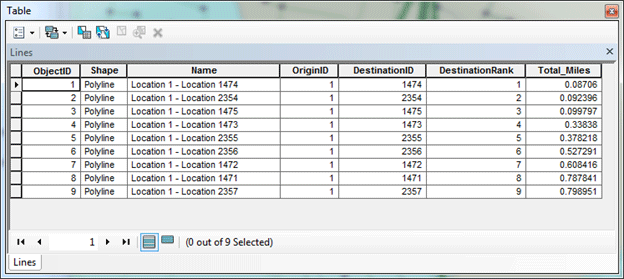
Right-click Lines (9) in the Network Analyst window, and select Open Attribute Table.
You can find the distances between the school and those bus stops that are with one-mile range. This is based on the street network, not the straight-line distance. Fewer bus stops are identified using this method, compared to the straight-line method.
prepared by Ming-Chun Lee, 03/15/2014
|